How to safely change a flat tire

changing flat tire

Knowing how to change a flat tire is a requisite skill for all drivers. Normally, flat tires can come about at any place and time, and with no emergency roadside assistance, you may suffer. Nearly 2 in 10 U.S drivers find it difficult to perform this task. Whether you’re a teen or a seasoned driver, it’s time to know how to fix this problem.

If you don’t know how, you’ll be left spending big bucks for the help of a towing company near you.

With the perfect tools and know-how, it’s easier to avoid being stranded along the side of busy roads. As a car expert, I’ve swapped my tires countless times. In this guide, I’ll help you understand the easy steps of changing a tire. If you’re driving in a city street,

Find a safe location or spot

This is the first and important step. Once you’ve noticed you’ve got an expected flat tire, don’t turn or brake suddenly. Instead, reduce the speed of the car slowly. Then, look for a suitable place where you can safely stop to assess the situation. A wider shoulder or a parking lot are two fine options. Level ground is great because it will prevent your car from rolling.

Locate or discover your spare tire

Every car is different; however, locating your spare tire should be easier. Most vehicles have spare tire situated underneath a carpet of a trunk. Also, you’ll discover that some cars mount their spare wheel visibly on the rear hatch. Be proactive by making sure your spare holds air and has good tread before kicking off a road trip.

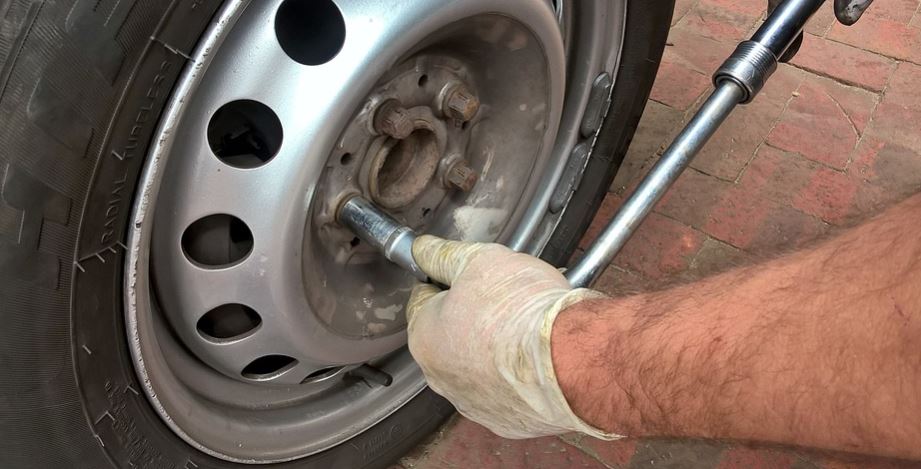
Loosen the car’s lug nuts

Don’t forget to carry the relevant tools. It’s these tools that will help you to loosen your lug nuts. You’re advised to do this prior to jacking up your car. This is because once the flat wheel is off the ground, then the cranking motion might spin the wheel only rather than loosening the lug nuts. Less tightening the lug guts is usually harder. It’s the most labor-intensive task when it comes to changing the flat tire especially if the mechanic was the last person to install your wheels.

Position your jacking points & jack up the car

First, locate and position your vehicle’s jacking points. Noticeably, every car has different reinforced points under the body for securely and safely supporting a jack whenever you’re jacking up your car. Avoid jacking up in a spot that is not a jacking point. Why? You may experience the jack failing or risk damaging your car. In simple terms, locate the jacking points and get the job done.

Finish unscrewing the lug nuts & replace the tire

Using your wrench or hands unscrew lug nuts completely. Now that your flat wheel is off the ground, now it’s time to replace. Ensure you don’t misplace or lose some lug nuts since you’ll require them to secure the new tire. Now mount your spare wheel on your car. Secure the wheel by screwing on one lug nut while holding it in place. Then, screw on all the lug nuts and use your wrench to tighten them.

Using the jack lower your vehicle slightly & completely

After tightening the lug nuts, slightly lower the vehicle until the spare wheel touches the ground. Be careful to ensure you don’t interfere with your car’s whole weight. Eventually, check the tire pressure and return all the tools and equipment to your vehicle.

At this point, you can now take your flat wheel to a mechanic or a professional auto repair expert and have it replaced or fixed as soon as possible. Now you’ll be ready for travel.

Steps to Pro-Quality Interior Car Detailing

The kids are always dropping cereal between the seats, you’re forever parking next to mud puddles, and you’ve spilled coffee on your dashboard more than once. Cars often suffer from the little inconveniences life deals us, but these interior car detailing steps will erase the evidence of those mishaps.

1. Vacuum the Carpets

Your vacuum cleaner is your most valuable tool when it comes to detailing your car. Pull it out onto the driveway and use the brush extension to suck up all those dirt particles, food crumbs, and other debris. For stubborn spots and hard-to-reach crannies, a can of compressed air is also a great asset.

2. Scrub the Upholstery

Foam cleaner is the most efficient way to pull the stains from your car’s upholstery. Rub the cleaner into the fabric with the brush attachment or a separate stiff brush. Use a thick towel to pull out as much moisture as possible so it doesn’t invite mold or mildew into your car.

3. Clean Buttons and Steering Wheel

Dust is the biggest enemy inside a car, especially when it comes to the numerous buttons and knobs on the dashboard and steering wheel. Blow compressed air into these spaces to dislodge dust, then wipe it all down with a soft cloth and a mild cleaning agent.

4. Scrub Floor Mats

Pull all the mats out of the car and scrub them with dish detergent or another cleaner and a stiff brush. Rinse them down with the garden hose, then allow them to dry before you replace them. A non-slip agent helps prevent accidents behind the wheel, as well.

5. Brush Out Vents

The vents that dispense hot and cold air often become clogged with dust and debris. Use narrow brushes to dust out those vents and prevent dust from recirculating. This also works with the compartments in your glove box and center storage console.

6. Wipe Down

A bottle of glass cleaner and a soft, microfibre cloth are all you need to restore the shine in your car’s windows. Apply Armor-All or a similar product to all the smooth surfaces, then use the vacuum cleaner for a final spot-clean on the upholstery and floorboards.

Interior car detailing might take time, but it also makes driving far more pleasant. For extreme cases, consider professional detailing the first time so you won’t feel overwhelmed.

Tips For Attaching and Pulling a Moving Trailer

Practice makes perfect. Not everyone is a natural driver. I have watched with fascination someone trying to park a simple automobile in the parking lot below our patio. Back and forth again and again. Move a little right or left. Now double the problem and hook up a travel trailer behind the vehicle.

Of course, there are other things to consider when you arrive at the campsite. Water, electricity, sewer, jacks, hitches, and awnings. The first time you get to a campsite, you will be required to know all about these things so let us get started.

If you plan to transport a moving trailer on your own a long distance and are unsure or not confident in your abilities, proceed with caution. I suggest contacting the best Syracuse, NY moving companies for help in upstate New York.

Know Your Weights

A truck or auto’s tow rating (found in the proprietor’s manual) is a simplification of various figures. While towing in reality, what makes a difference most is your vehicle’s gross consolidated weight rating (GCWR). That is the aggregate sum of weight taking into consideration your whole apparatus: vehicle, inhabitants, and freight, in addition to everything in and on the trailer. So if you have additional travelers, they may diminish the measure of trailer weight you can pull. And while we’re grinding away, be aware of your vehicle’s gross vehicle weight rating (GVWR), which is how much weight you can hold in the vehicle, short the check weight. The evaluations for your vehicle can be found on a legislature mandated sticker within the driver’s entryway.

Another essential figure is tongue weight, which is the amount of the trailer’s weight lays on the hitch. A lot of weight on the tongue will take the weight off the tow vehicle’s front tires and make it harder to control (also that it will over-burden the back suspension).

Getting Hitched

Ensure you utilize the correct size hitch ball for your trailer. Try not to endeavor to utilize a 1-7/8-inch ball on a 2-inch trailer, despite the fact that they’re close. The trailer could fly off amid towing, which is awful. Ensure the trailer hook connects with easily, don’t battle it, and utilize a stick or bolt to keep it locked.

Concerning the hitch itself, utilize the perfect measure of drop (or rise), so the trailer is pretty much level when joined to your vehicle. Continuously utilize security chains—we get a kick out of the chance to connect them in an X so that regardless of the possibility that the trailer ends up plainly isolated there’s a sight chance the chains will support the tongue and diminish harm. After associating the lights, check to ensure they all work: brakes, dangers, left and right turn pointers, and running lights, with the tow vehicle’s headlights on.

Trailer Braking

For pulling heavier burdens, a trailer with electronic brakes is an unquestionable requirement. And that implies you require a trailer-brake controller inside your truck. If you have a more up to date truck with an implicit controller, you’re good to go. If you need to purchase a controller, avoid the less expensive choices. The greater part of them are clock based and essentially increment the measure of trailer braking the more you have your foot on the brake pedal. Rather, spend the additional cash on a corresponding brake controller, which coordinates the trailer brake yield to the tow vehicle’s deceleration. A quality unit can be found for under $150, which is significantly less expensive than any mischance.

To modify the pick up on a trailer-brake controller, drive up to around 20 miles for every hour with the trailer connected and ease back to a stop. You need the trailer brakes to be spot on the limit of locking up.

On the Road

When driving with a trailer, give yourself more space behind different vehicles so that there’s a lot of space for braking, which will take longer due to the additional weight. On corners, turn later and more keen to square off the bend, which will help keep the trailer from cut-out controls (or more regrettable). And if the trailer begins influencing from side to side, tenderly apply the brakes to back off and bring everything once again into line. If you have a brake controller, crushing the lift button will likewise help lessen influence.

Back It On Up

Turning around a trailer can be dubious. One approach to keep away from any inconvenience is to ensure you don’t get in a circumstance where you’ll need to utilize turn around. (Accept our recommendation: Just avoid the drive-through path, regardless of the possibility that it looks simple.)

Once in a while moving in reverse is unavoidable. In those cases, move gradually as you get used to the way the trailer moves backward. To influence controlling simpler, to put your hand on the base of the guiding haggle it toward the path you need the trailer to go.

Engine Detailing Tips for Beginners

If you’ve ever popped the hood on your vehicle, you’ve probably noticed that it’s a mess. Dirt and dust build up over the years, often sealed to exposed surfaces by layers of grease. Engine detailing is the only way to eliminate all those contaminants, and it isn’t as difficult as you might think.

Cover Sensitive Parts

Water isn’t dangerous for most of your vehicle’s engine bay, but it can damage a few key parts. Grab a box of Saran wrap and a roll of masking tape before you begin. Use the plastic wrap to cover any vulnerable car parts that you don’t want to get wet. These might include:

  • Vehicle Alternator
  • Alarm System Housing
  • Exposed Electrical Plugs and Cords
  • Air Control Valves and Intake System

Use your vehicle’s manual to find all these components (as well as any others specific to your car’s make and model). If you’re nervous about this step, consult with a mechanic before you attempt engine detailing the first time.

Start Safe

Always begin detailing a vehicle engine with a cold engine. Use a soft stream of water from your garden hose to cool down the engine bay so you can work safely. Avoid pressure washers or other high-pressure devices because you can crack or chip delicate engine parts. Heavy streams might also dislodge the wrappings you’ve secured around sensitive areas.

Degrease the Engine Compartment

A heavy-duty degreasing agent is the most important tool in your arsenal. Use it to eliminate grease from all exposed areas of your engine bay, paying special attention to fluid holders and all hoses and tubes. After you’ve applied degreaser, use the garden hose to spray off the film.

For hard-to-reach areas, choose a detailing brush with nylon or microfibre bristles. This will allow you to reach into areas where your hand won’t fit, and will also work the cleaning agent into stubborn stains. Use microfibre towels to dry all the engine components after you’ve cleaned them.

Polish or Seal the Job

After you’ve cleaned the engine, use a sealant or protectant to seal out future contaminants and add a touch of shine to the finished product. Choose a paint sealant for surfaces coated in paint and a plastic or rubber sealant for everything else (such as the hoses).

Caring For Your Car – Exterior Car Detailing Steps

If a neighbor scrawls the words “Wash Me” in the dust on your car’s windshield—or if there’s enough dust to do it yourself—it’s time to take action. Exterior car detailing isn’t a complicated process, but it does take a little time. Carve out an afternoon next weekend and get to work!

1. Scrub the Tires

A non-acid based tire cleaner will strip the grease and grime off the rubber as well as your rims without inflicting any damage. Spray the cleaner or degreaser on the wheels, then let it soak in for a minute while you grab a stiff tire brush. Scrub all surfaces of the tire and rim, then spray off the residue with a garden hose.

2. Remove Excess Tire Grime with a Pressure Washer

Pressure washers produce too heavy a stream for most of your car’s exterior, but it won’t damage your tires if you leave it on the lowest setting. Stubborn grease and grime will usually come off if the surface has been soaked in a cleaner for a minute or two. A second scrubbing with the tire brush might become necessary in extreme cases.

3. Wash the Paint in Sections

Grab a large pail and a bottle of a car wash. Use medium-warm water to create a sudsy liquid in the bucket, then dunk a soft sponge into the mixture. Clean the exterior of your car in small sections, pausing to rinse off the soap every three or four minutes. This prevents soap from drying on the paint and causing pits.

Avoid dish detergent or any other cleaner not meant specifically for cars. Dish soap contains chemicals that cause auto paint to oxidize faster, which might leave your vehicle with streaks or patches of missing paint. Air-drying your vehicle will result in soap spots. To avoid this, grab a soft towel or chamois and rub all visible paint until it’s dry.

4. Clean the Windows

Make sure the glass cleaner you choose doesn’t include ammonia or vinegar. These substances will degrade the film used on tinted windows. You might check your local auto parts store for a compatible cleaner that won’t inflict any damage on your windows.

Now you can sit back and admire your hard work. As a bonus, you won’t have to worry about any more embarrassing “notes” from your neighbors.

loading
×